

Who knew that a little twist in the way we insert our crochet hook could create such a beautiful texture? 😍
If you’ve been exploring different crochet ribbing techniques with me, welcome back to another episode of Let’s Make Our Crochet Projects More Interesting!
This time, we’re putting the spotlight on front post and back post crochet ribbing!
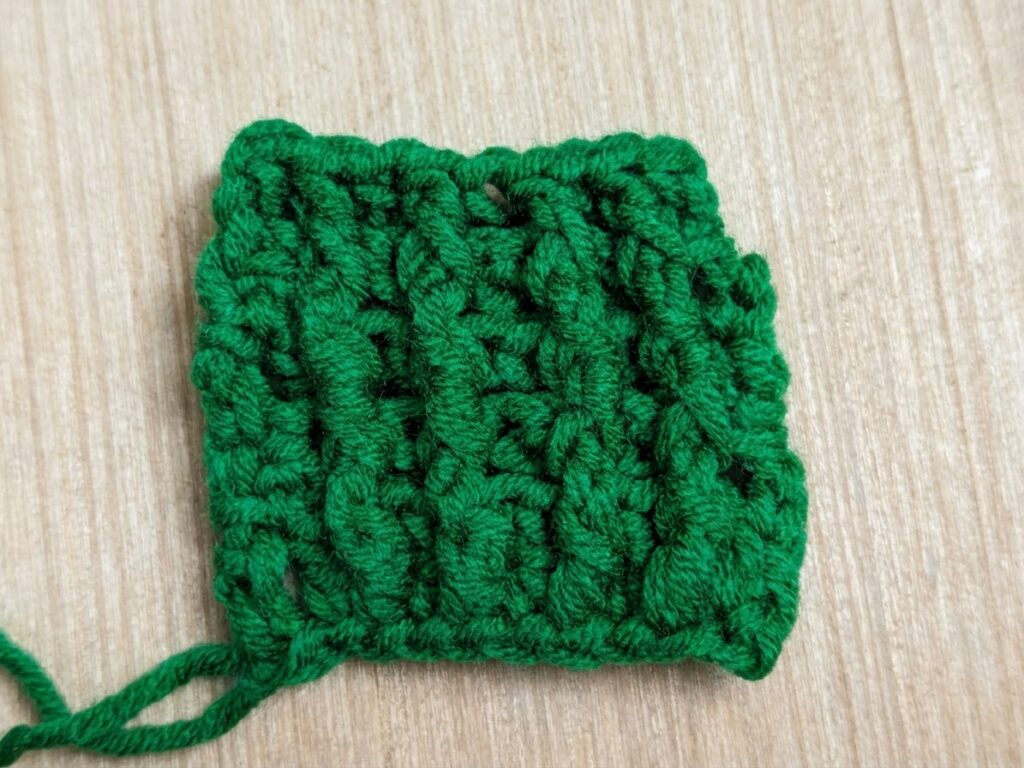
Unlike the ribbing techniques I’ve shared in my previous tutorials, this one works around the posts of your stitches instead of through their top loops. The result is a beautifully textured fabric with raised columns that give your crochet projects a lovely ribbed appearance.
And the best part? You don’t need to learn a complicated new stitch to make it happen!
If you’re familiar with double crochet, you’re already halfway there. So grab your yarn, pick up your hook, and let’s create some texture together!
What Is Front Post and Back Post Crochet Ribbing?
Front post and back post crochet ribbing is a technique that creates raised and recessed columns by working stitches around the vertical posts of stitches in the previous row.
Normally, when crocheting a double crochet stitch, you insert your hook under the two top loops of the stitch.
With post stitches, things work a little differently!
Instead of inserting your hook through those top loops, you’ll work around the vertical post of the stitch.
There are two basic techniques:
Front Post Double Crochet (FPDC)
For a front post double crochet, you’ll insert your hook from the front of your work, around the post, and back to the front.
This makes the post stand out toward the front of your fabric.
Back Post Double Crochet (BPDC)
For a back post double crochet, you’ll insert your hook from the back of your work, around the post, and return to the back.
This pushes the post toward the back of your fabric.
When you alternate these stitches, they create contrasting raised and recessed columns that give your fabric its distinctive ribbed texture.
It’s like giving your crochet stitches a little 3D makeover! 😂
How to Crochet Front Post and Back Post Ribbing
For this tutorial, we’ll use double crochet stitches to create our ribbing.
Step 1: Make Your Foundation Chain
Start by making a foundation chain of your desired length.
For this sample, you can chain 13.
Step 2: Work the First Row
Skip the first three chains from your hook, then work one double crochet into the fourth chain.
Continue working one double crochet into each chain across the row.
Your first row establishes the foundation for your post stitches.
Step 3: Work a Front Post Double Crochet
At the end of the row, turn your work and make 2 stacks of SCs for a neat edges.
Yarn over, then insert your hook from the front of your work around the post of the next stitch.
Your hook should travel from front to back on one side of the post and from back to front on the other side.
Yarn over and pull up a loop.
You should now have three loops on your hook.
Yarn over and pull through the first two loops.
Yarn over again and pull through the remaining two loops.
Congratulations! You’ve just made a front post double crochet.
Step 4: Work a Back Post Double Crochet
Now let’s try the other side!
Yarn over, then insert your hook from the back of your work around the post of the next stitch.
Your hook travels around the post in the opposite direction from the front post technique.
Yarn over and pull up a loop.
You should have three loops on your hook.
Yarn over and pull through the first two loops.
Yarn over again and pull through the remaining two loops.
And there you have it: a back post double crochet!
Step 6: Alternate Front Post and Back Post Stitches
Continue alternating one front post double crochet and one back post double crochet across the row.
Repeat this sequence until you reach the end.
Depending on your stitch count, you may need to adjust the final stitch to maintain the pattern.
Step 7: Reminder!
Turn your work and make 2 stacks SC.
Here’s the important part!
To maintain the ribbed texture, work a front post double crochet around the front post of the stitch that appears raised toward you, and a back post double crochet around the post that recedes away from you.
In other words, work around the posts as they appear on the current side of your fabric, following the raised and recessed columns.
Continue this pattern across every row.
Repeat until your swatch reaches your desired length.
Look at that texture! 😍 Your front post and back post crochet ribbing is coming together beautifully.
A little tip: Keep your tension consistent as you work around each post. If your stitches are too tight, your fabric may become stiff. If they’re too loose, the ribbing may look less defined.
What Makes Front Post and Back Post Ribbing Special?
One of the things I love about this technique is how much texture it adds to a project.
You can use front post and back post stitches to create a ribbed effect without relying on back-loop-only stitches.
Here are a few reasons to give this technique a try:
1. It creates beautiful texture.
The raised and recessed columns give your crochet fabric a more dimensional appearance.
2. It adds visual interest.
Even a simple double crochet project can look more detailed when you introduce post stitches.
3. It works for different projects.
You can use post stitches for cuffs, hems, hat brims, scarves, blankets, and other projects that benefit from a textured finish.
4. It gives you more ways to experiment.
Once you’re comfortable with FPDC and BPDC, you can experiment with different stitch sequences to create your own patterns.
Just remember that post-stitch ribbing doesn’t automatically have the same stretch and recovery as every other ribbing technique. If your project needs a snug fit, make a swatch and test it before committing to the whole project.
Front Post and Back Post Ribbing vs. Other Crochet Ribbing Techniques
If you’ve been following my crochet ribbing tutorials, you know that there are several ways to create a ribbed effect.
Let’s see how this technique compares with some of the others I’ve explored.
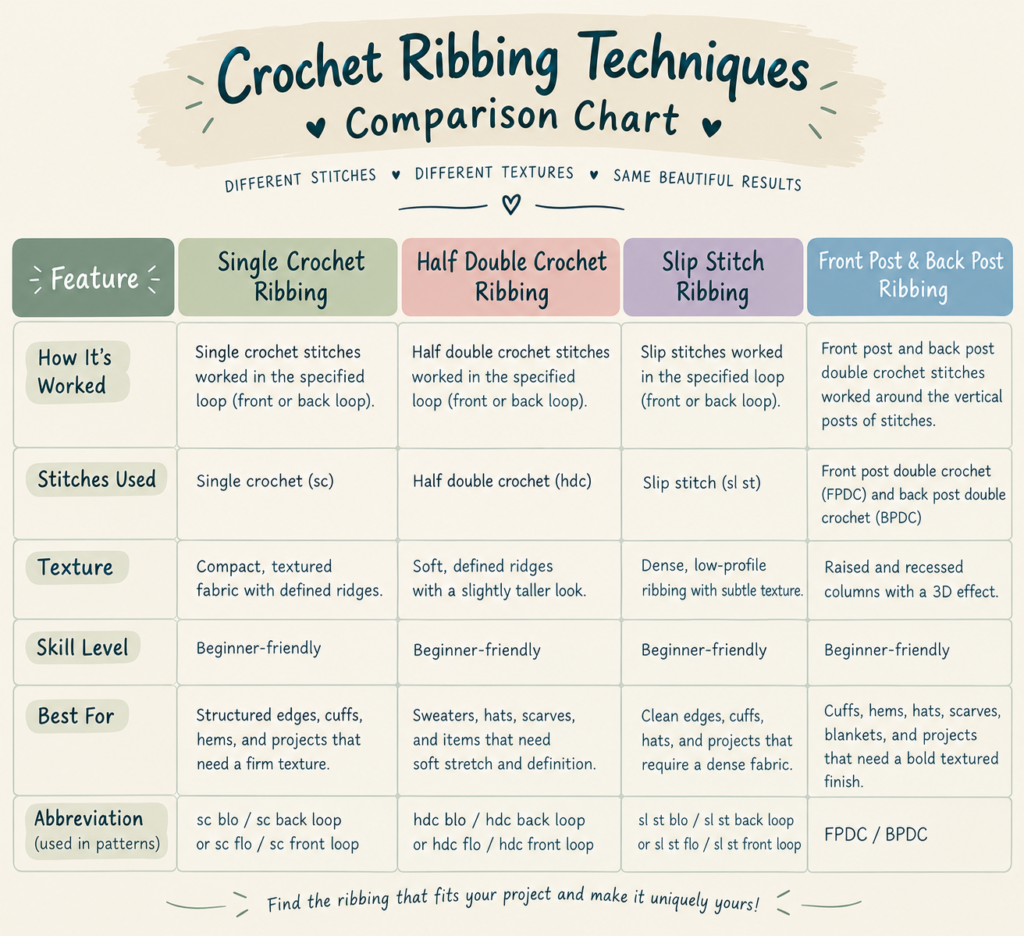
Each technique has its own personality, which is why I enjoy exploring different ribbing styles.
If you want to compare the finished textures, try making small swatches using the same yarn. You’ll quickly see how the stitch structure changes the look and feel of your fabric!
Common Mistakes to Avoid
Even a simple technique can take a little practice, so don’t worry if your first swatch doesn’t look exactly how you imagined.
Here are a few things to watch out for.
Working through the top loops instead of around the post
This is probably the most important distinction to remember.
With FPDC and BPDC, your hook goes around the vertical post of the stitch, not through its top loops.
Mixing up front post and back post stitches
If your ribbing looks inconsistent, check the direction in which you’re inserting your hook.
Front post stitches are worked around the post from the front, while back post stitches are worked around it from the back.
Forgetting to follow the stitch pattern on the next row
When you turn your work, pay attention to the raised and recessed columns.
Following the existing columns helps maintain the ribbed texture.
Using inconsistent tension
Try to keep your stitches even throughout the swatch. This will help your ribbing look more uniform.
And if you need to unravel a few stitches to fix a mistake, don’t panic. That’s part of crocheting! We’ve all had those moments when our hook seems to have a mind of its own. 😂
Final Thoughts
Crochet never ceases to amaze me. Sometimes, changing how we work around a stitch is all it takes to create an entirely different texture.
Front post and back post crochet ribbing is a wonderful technique to add to your crochet toolbox, especially if you enjoy experimenting with texture and dimension.
If you’re new to post stitches, take your time and practice with a small swatch first. Once you get the hang of it, you’ll have another technique ready for your future crochet projects!
And remember, there’s no single ribbing technique that works best for every project. Experiment, compare, and find the one you love most.
If you enjoyed this tutorial, please check out my other tutorials and stories on the blog, along with the newly made crafts in my shop.
Happy crocheting, everyone! 💚🧶